Overview
We all know that IBM DataPower is a very powerful edge platform for the deployment, management, protection, and execution of cloud and on-prem API’s. The most ubiquitous method of managing the appliances (and now instances) is the provided Web Management Console. As its name implies, this is the provided browser-based management interface with menus and utilities to perform management functions in DataPower. If you have one DataPower or, more typically, two (one DMZ and one Internal) then this management interface is probably all you need. But if you are in an environment with thousands or millions of transactions per minute, then you probably have four, eight, a dozen, or more appliances or instances redundantly grouped across multiple datacenters. In such cases, logging on to each via individual browser tabs to perform similar functions or check status can get very tedius very quickly.
IBM provides another interface in DataPower called the XML Management Interface. This interface services a set of API’s called SOMA (SOap MAnagement) and AMP (App Management Protocol) services. These are SOAP services defined by a WSDLs (more on that later). You can execute these calls with any SOAP tool, or even from a command line with CURL. But we are going to use these SOMA and AMP API’s to create toolbox of reusable utilities and reports using SoapUI. Our toolbox will have a common library of API calls that we can use in multiple utilities without having to re-define them and have redundant code everywhere they are used.
What’s the big deal about that, you ask? You probably create common functions all the time and copy them into different programs with various types of include() functions or statements. Yeah, about that. SoapUI has a testing facility with limited scripting capabilities. It’s not really an HLL so it doesn’t support things like copybooks or includes. So this tutorial is going to show you an object based method to set up common libraries and functions within the confines of soapUI’s TestSuites and scripting.
The Pieces
As you may have surmised, the pieces needed for this turorial are:
- IBM DataPower
- SoapUI
- Apache Groovy Programming Language
- IBM SOMA and AMP API WSDL’s and XSD’s

IBM DataPower
For the purposes of this tutorial I will assume that you have access to at least one DataPower appliance or instance and that you have administrative rights to it.
SoapUI
SoapUI is a great program for easily importing WSDL’s and running the API’s. It also has a testing facility that allows you (with scripting) to string together multiple API calls in order to perform more complete testing or, in our case, to create complex utilities and reports. If you don’t have it, you can download the open source version of SoapUI here. For the remainder of this tutorial I will assume that you already have it installed on your computer.
Apache Groovy
The Apache Groovy language is what SoapUI uses for its test scripting facilities, so you will need to know at least the basics of the language. You don’t need to download anything as it is already included in SoapUI. You can learn the basics of the groovy language here.
IBM SOMA and AMP WSDL’s
You will be downloading the SOMA and AMP wsdl and XSD files from your DataPower appliance and then importing those into your SoapUI workspace. We will be covering those steps in detail later in the tutorial.
Enabling the XML Mgmt Interface on DataPower
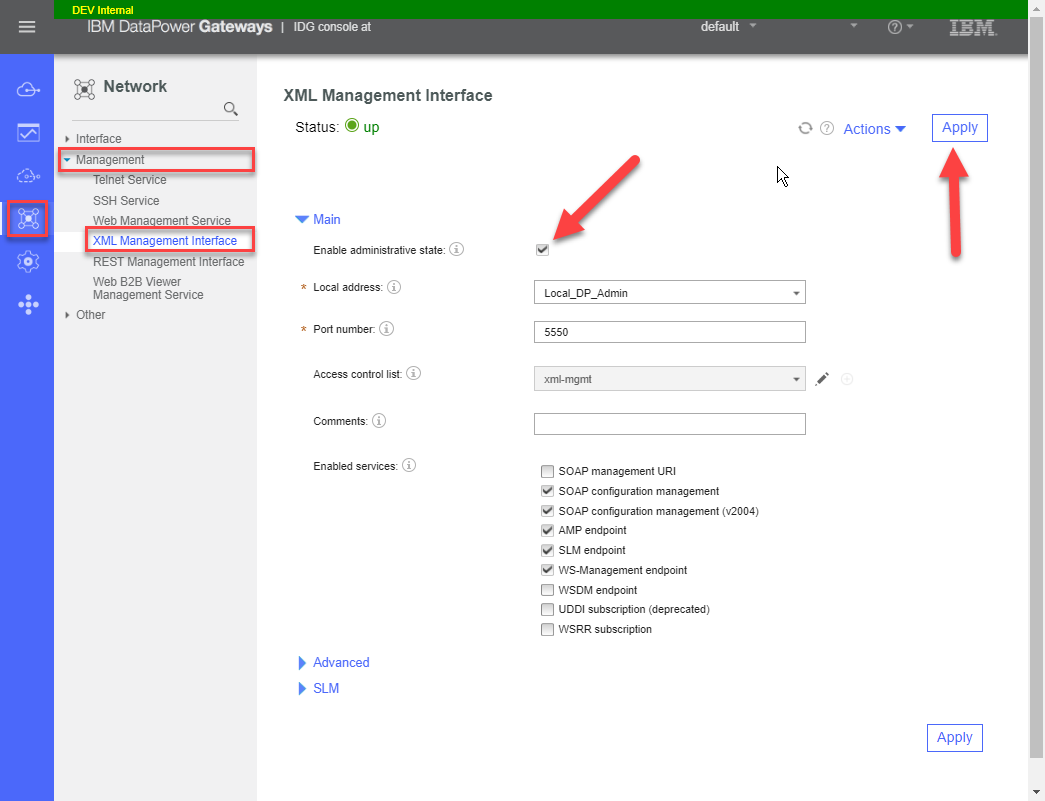
Obviously we cannot use the XML Management interface if it’s not enabled. You enable the interface via the Web Management console. Here are the steps to accomplish this:
- Log on to DataPower as an Administrator and into the default domain. Here I am using the Blueprint Console of the Web Management interface.
- Click on the “Network” icon in the left-side menu
- Expand the “Management” drop-down menu
- Select the “XML Management Interface” option
- Check the “Enable Administrative State” box
- Enter the host alias for your DataPower Management Interface IP or the IP address directly
- Click the “Apply” button at the top-right or top-left of the page
- Save your configuration
Those are the basics required, but there are some other options on that screen that we will briefly cover here so you don’t obsess over them.
Port Number: The default port for the XML Management Interface is 5550. You can change this to another available port number if you wish. For the purposes of this tutorial I am using the default.
Access Control List (ACL): You can choose to secure the use of this interface by specifying which IP addresses (via CIDR notation) are allowed to connect to it and/or specify which IP addresses or ranges are denied access.
Enabled Services: I normally only enable SOAP and AMP interfaces, but you can leave the defaults if you want to experiment with or use the other mentioned services.
Advanced: You can use SSL to secure this interface. You can do so using all of the options available in an SSL Server/Client profile. This is an advanced feature of DataPower configuration which we will not delve into here. If left at the defaults, the interface will still be secured via HTTPS using the appliances global SSL certificate.
SLM: If your DataPower is part of an SLM group, you would configure the update interval here. This is another advanced feature of the DataPower platform which we will not cover here.
Setup SoapUI Workspace
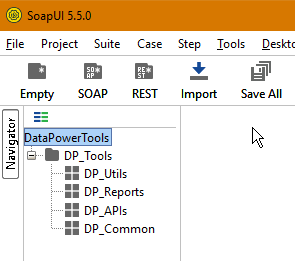
Create a new workspace in SoapUI and name it something creative like “DataPowerTools”.
- Right-click on the workspace name and select “New SOAP Project”. Enter a project name of “DP_Tools”
- Right-click on the project and select “New TestSuite”. Name it “DP_Utils”
- Create another new TestSuite and name it “DP_Reports”
- Create another new TestSuite and name it “DP_APIs”
- Create another new TestSuite and name it “DP_Common”
When you are done with these steps, your workspace should look like this and we are ready to get busy!
Download SOMA and AMP WSDL’s
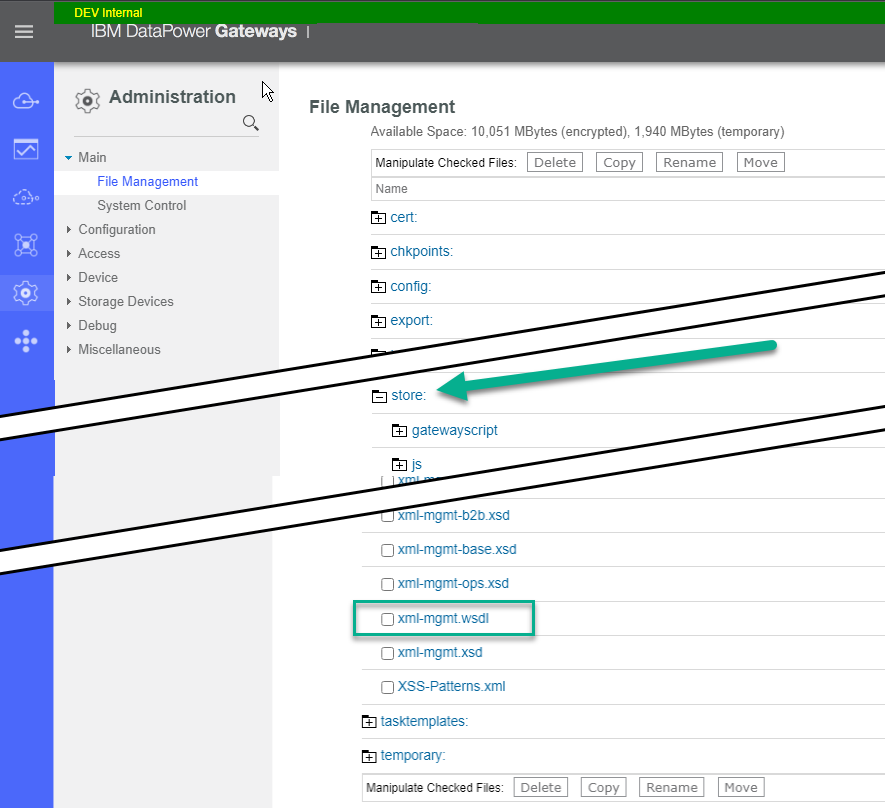
You can download the SOMA and AMP WSDL’s directly from the DataPower appliance or instance. Log onto DataPower and navigate to the Administration menu. Under the Main submenu, select the File Management option.
Scroll down to the “store” folder and expand it. Near the top of the folder you will find the “app-mgmt-protocol-v3*” files and near bottom of that folder you will find the “xml-mgmt*” files. These are the WSDL’s and XSD files you will need:
- app-mgmt-protocol-v3.wsld
- app-mgmt-protocol-v3.xsd
- xml-mgmt.wsdl
- xml-mgmt.xsd
- xml-mgmt-b2b.xsd
- xml-mgmt-base.xsd
- xml-mgmt-ops.xsd
You can download them by right-clicking the file name and selecting “save link as”. Save them somewhere on your computer. A good place is wherever you are saving your SoapUI workspace and project files (the default is your user’s home directory “C:\Users\youruserid”).
Import SOMA and AMP WSDL’s Into SoapUI
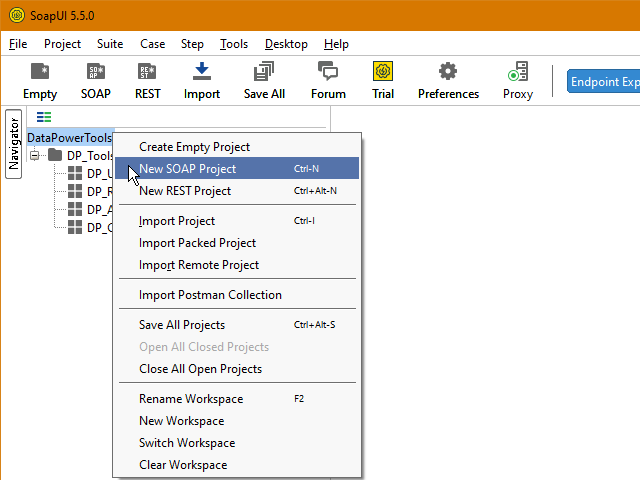
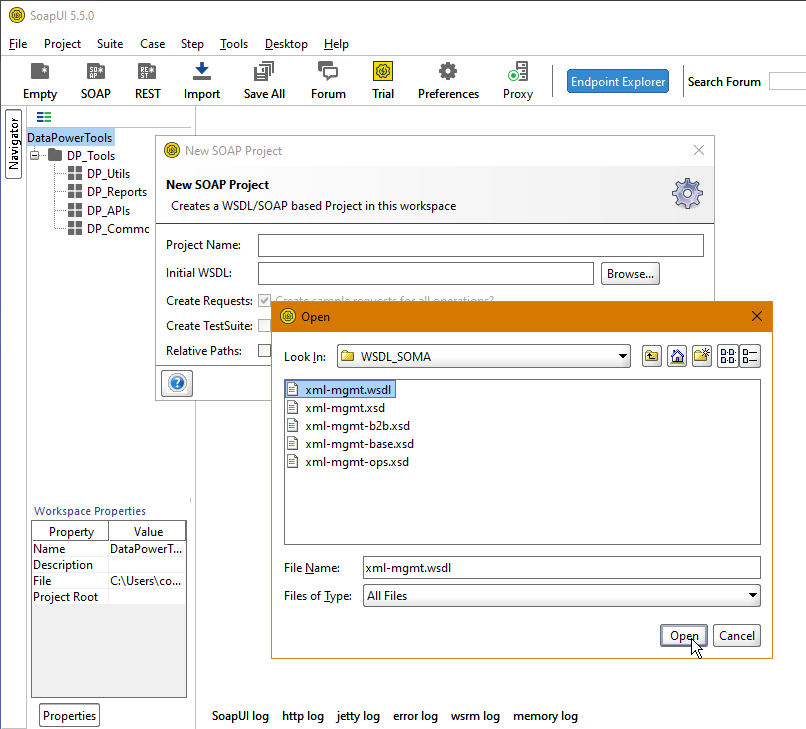
Now it’s time to add the actual service WSDL’s to SoapUI. You do this by right-clicking on the workspace name and selecting New Soap Project. Be sure to right-click on the workspace name “DataPowerTools” and not the project “DP_Tools”. This is because we are going to import the full WSDL’s as their own projects and select which API’s we will be using as we need them.
In the “New Soap Project” window, click the browse button next to the initial WSDL box and navigate to the folder where you saved the DataPower WSDL files. Select the “xml-mgmt.wsdl” file and then click “OK”. Don’t worry about the Project Name field, it will be filled in by the WSDL.
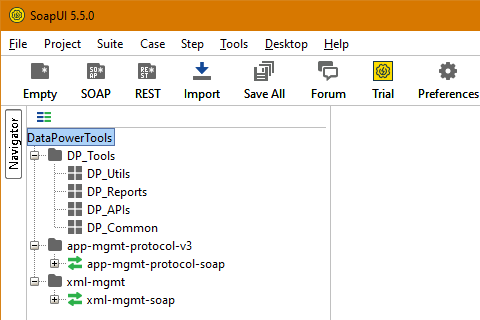
After the WSDL is added as a new project, do the same with the “app-mgmt-protocol-v3.wsdl”.
List Active Users SOAP Request
We will build out our reusable API framework while simultaneously building our first utility, “Show Active Users”. This utility will cycle through some or all of our appliances and list all user accounts that are currently logged in to the device. This relatively simple utility will use one IBM API that we will put into our common “DP_APIs” test suite, and one common function that we will put into our “DP_Common” test suite. Once created, these functions will be available to be easily reused by any future utility we create.
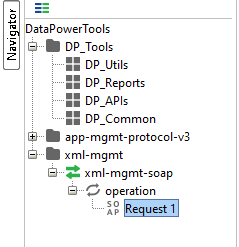
The first thing we need to do is identify the SOMA API that will retrieve for us the list of active users on our DataPower appliances. To do this, expand the “xml-mgmt” project, then the “xml-mgmt-soap” interface, then the “operation” mock service, and finally double-click “Request1”. When you do this, SoapUI opens the request XML in the left-side pane of the editor window. The first thing you will notice is that the request XML is HUGE. Every function that the SOMA API supports is in this one request XML! But don’t get intimidated, you only need a small part of this request for any given action.
To get the list of all active users, we are only interested in the “get-status” operation, as shown below:
Now that we have an API that will return the list ofactive users, we had better test it out and make sure that it will do just that. So the first thing we need to do is modify the request with the parameters it needs to its job. First, modify the request URL so the request goes to one of your DataPower appliances or instances. Leave the port nunber and URI/endpoint unchanged. Next, set the domain attribute equal to “default” and set the class attribute equal to “ActiveUsers”. Be sure your letter case is accurate, it matters. You can delete the “object-class” and “object-name” attributes – we don’t need them for this action.
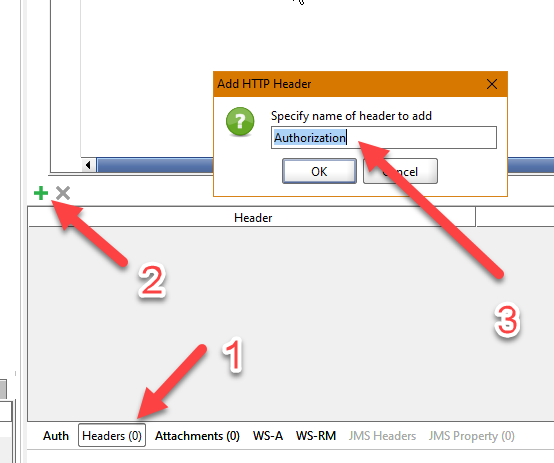
Before you can actually execute your request you need to be able to log into the DataPower. To do this, we are going to add our base 64 encoded user id and password as a basic auth header to our request. Yes, I know you can do this using the “Auth” panel directly, but adding it manually as a header will allow us to soft-code it later when we turn it into re-usable module.
- Click the “Headers” button to open the Header panel
- Click the “+” sign at the top-left of the Header panel
- Enter the word “Authorization” for the header name and click “OK”
Now you see the “Authorization” header in the Header list. Click the box to the right of the “Authorization” header name and paste/enter the word “Basic” followed by a space and then the base 64 encoded string of your DataPower user id and password. If you don’t know what this is, it’s basically your userid and password in the form “myuserid:mypassword” and then base 64 encoded (there are plenty of free tools on the Internet to do this). When done, your header should look like the one in this image. You can click the “Headers” button again to close the panel.
Click the “Run” button on the request.
If you did everything correctly, then the request will return a response that looks something like the image to the left. Looking at the response, you can clearly see id’s of the users currently logged into the device. You will note that your own id also shows up since you did just log in to run this API! Keep this in mind for later.
Now that we have a working and pared down SOAP call, let’s give it a name that reflects what it actually does. Right-click on the soap operation name and select “Rename” from the pop-up menu. Rename it to “ListActiveUsersSoap”.
We’re doing great so far. But even though we have a working SOAP call, it is still in its own soapUI project (xml-mgmt). So now, we are going to create a new test case under the “DP_APIs” test suite in our “DataPowerTools” project. This is where all of our re-usable api calls will live.
Right-click on the “DP_APIs” test suite and select “New Test Case” from the pop-up menu. Enter “ListActiveUsers” for the name and press “OK”.
Now expand the new test case until you see the “Test Steps” section. It should say (0) test steps currently.
Now drag-and-drop your ListActiveUsersSoap request and drop it onto the new “Test Steps” section as shown in the image to the left.
You will get a prompt window asking you to confirm that you want to add the request to the test case. Click “Yes”.
The first time you copy a request from the SOMA project (xml-mgmt) to your DataPowerTools project, you will be notified that your project is missing the necessary interfaces for the SOMA request and it will prompt you to add them. Click “Yes”.
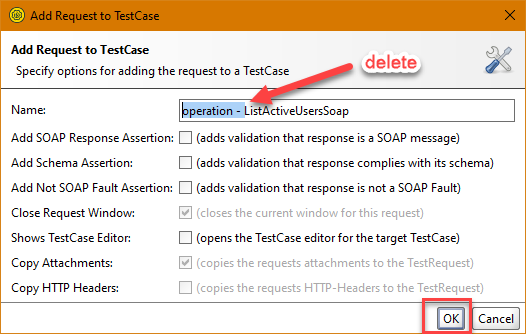
You will then be presented with the “Add Request to TestCase” window. You will note how it adds “operation -” to the front of the request name. You can remove that so the name remains “ListActiveUsersSoap”. Uncheck any of the other boxes that may be checked by default (some you cannot uncheck, that’s OK) and press “OK”.
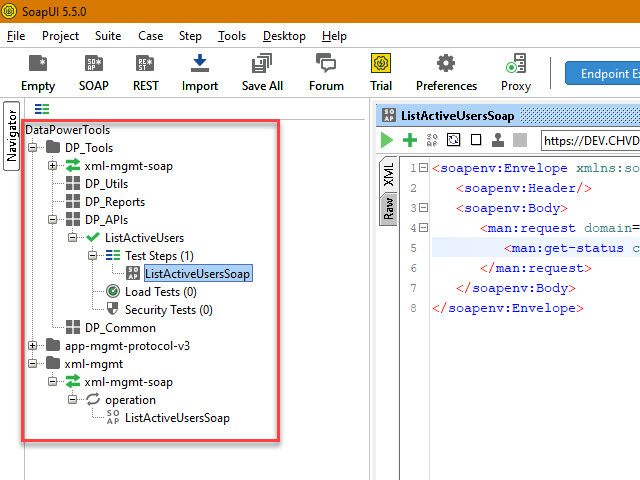
The request will be added to the TestCase and the request will be opened in a window in the editing pane.
At this point, your project should look similar to the image to the left.
Now it’s time to create a groovy wrapper around this request that will make it into a reusable resource for your utilities.
Time to code!
ListActiveUsers Reusable Object
So far we only have a usable SOAP request. You can certainly open up this request and run it for each of your DataPower devices and look at the SOAP response for each invokation and see who is logged in. But we want to use and execute this soap request for each DataPower device in a single operation and output readable messages to the soapUI log window so we can quickly and easily check all of our devices at the same time and know who is logged in.
In order to write such a utility that will live in our “DP_Utils” TestSuite (are you seeing a pattern yet?) we will first put our ListActiveUsersSoap SOAP request into an object wrapper that we can instaniate and use easily from any utility or report we write. This object wrapper will be created as a Test Script and written in the Groovy language.
Let’s begin.
The first thing we are going to do is add a Groovy script along side our ListActiveUsersSoap request.
- Expand DP_Tools
- Expand DP_APIs
- Epand ListActiveUsers
- Expand Test Steps
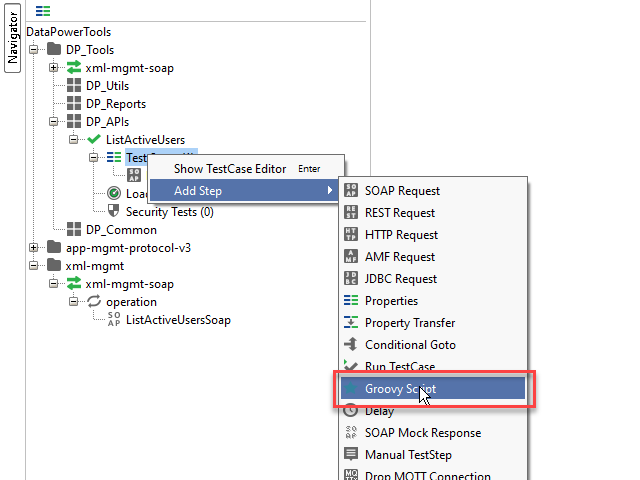
Right-Click on Test Steps and select Add Step -> Groovy Script as shown in the screenshot to the left.
Name the new script ListActiveUsers and click “OK”. The ListActiveUsers groovy script will be added below the ListActiveUsersSoap request in your Test Steps and a blank groovy editor window will be opened.
So let’s first take a look at the groovy code that defines our basic reusable api object. This will be the same for all of our reusable api’s so you will become very familiar with it. After we understand this construct we will go back and add in the code that actually executes the ListActiveUsersSoap SOAP request and returns the results.
(a) Standard program headers and footers – let’s not be lazy.
(b) Import some standard utilities and definitions. They both do exactly what they say.
(c) Here is where we define the reusable object class and its properties. Later api’s may have additional properties, but they will *ALL have these three properties at a minimum. In short, because the utilities we create will be scripts that will instantiate this object and execute its methods, we need to pass references to the calling script’s log, context, and testrunner in order for our class to function as part of the callers run scope.
(d) Class Constructor. When the class is instantiated we set the object’s properties to the values passed in as arguments.
(e) runAPI() method. This is where we actually execute the SOAP call. IE: the utility or report script will invoke this method each time it wants to make the ListActiveUsersSoap call. We will add the required code for that in a moment, but you can immediately see that we will need to pass in a DataPower device name as the argument for each execution. You can also see that we need to instantiate a GroovyUtils object based on the current context of the script that is calling this method. GroovyUtils is necessary in order to pass the SOAP response XML back to the calling script as an object.
(f) important! You will note that this last line of code is outside of the class definition. The reason for this is because utilities and reports that use this object will actually execute (run) this script in order to both define and instantiate the class – they will not instantiate the object directly with the new() operator. So running this script from any utility will load the class definition and then this single line at the end actually instantiates the object using the new() operator, and assigns it to a context property named “ListActiveUsers”. This property is then used by the utility or report script to access the methods of the class (as we will see later).
Executing the SOAP Call
In order for our class to execute the ListActiveUsersSoap request we need it to do three things first:
- We need to instantate the SOAP request as a testRequest object.
- We need to set the Basic Auth header of the request with our base64 credentials, like we did when we tested the request, only this time we will get the value from a property we set at the test suite level.
- We need to set the API Endpoint for the request so it goes to the DataPower device that we need it to.
So right below the line where we instantiate GroovyUtils, add the three lines of code as shown.
The first line, def dp_apis, creates a variable that points to our common API library, DP_APIs.
The next line, def api, creates a variable that points to the actual test step that is our ListActiveUsersSoap request. You could do these two lines in one single step, but the line of code would be really long and I like to keep my code readable.
Now that we have a variable that points to the soap request, the next line uses the .testRequest method to instantiate a request object that we can execute in our code.
The next thing we need to do is add a basic auth header to our request. We did this back when we were testing the SOAP call so it should be familiar to you. Now, we could just do as we did before and add the header to the SOAP request, itself. But if we ever change our password or credentials then we have to go back to all the SOAP requests in our common library and change them. For this reason, I prefer to save my basic auth credentials in a property at the Test Suite level and use code to add it dynamically to the request object at execution time.
So go ahead and double-click the DP_Utils Test Suite. When the window opens, click on the Properties button towards the bottom and the click the “+” sign to add a property. Enter “__Authorization” for the property name and then add your basic auth base64 credentials for the value.
Go ahead and add these four lines of code just below where we created the request object. The first line defines a variable named authHeader that points to the property at the TestSuite level where you just stored your basic auth string. The next line creates a temporary object from the headers of the request object we just instantiated above on line 40. This is necessary in order to manipulate the headers. The third line adds a header named Authorization to our temporary object and assigns to it the basic auth value we just retrieved from the test suite property. The last line creates a string map of the temporary object and assigns that back to the headers of the actual request object. Four lines of code are not a bad trade-off for the convenience of soft-coding our basic auth credentials.
So the last thing we need to do before executing the SOAP call is to override the SOAP request endpoint to send the request to the right DataPower device. This is the equivalent of the drop-down endpoint box at the top of the SOAP request test step. We use the string that is passed in as an argument to concatenate the connection string. The argument can be the DNS name of the device, the IP address of the device, or the name you associated with the devices IP address in your hosts file (more on this later). After we have the connection string, we use the .setEndpoint() method of the request object to assign the string as the endpoint for the call.
Now that we have done all the preliminary work, it’s time to execute the ListActiveUsersSoap SOAP call.
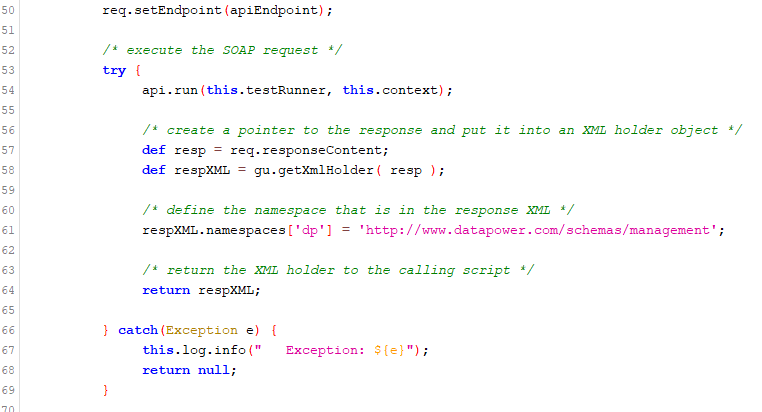
We will put the execution of the SOAP call into a standard try/catch construct. If an error occurs the catch block will print the error to the running log output. This is why we pass the calling scripts log object into the constructor of our class. Without that we cannot write messages to the log output of the running script.
To execute the SOAP call, we use the .run() method of the ListActiveUsersSoap test step object (the one we instantiated as the “api” variable). We pass the method the testRunner and context objects that were passed in the constructor from the calling script. This ensures that the call is executed in the same scope as the calling script.
Next, we create a pointer to the SOAP response and place it into an XML Holder (remember that GroovyUtils thingy?). Although we can get the SOAP response and save it as an XML object, we no longer have the benefit of having the namespaces defined by the request so the next line of code manually defines that namespace and adds it to the XML Holder.
And the last bit of business is to return that XML Holder to the calling script.
With that, we have completed the coding of the reusable api object. We can now execute this api call from any utility or report that we create without having to copy/paste a good chunk of this same code into every one of them.
A Non-API Reusable Function
One of the most common things that we will be doing with our utilities and reports is looping through groups of our DataPower devices to either perform the same function on all the devices in a group or to gather similar information from all the devices in the group. In the case of checking for logged-in users, we will be doing the latter – checking all our devices or a subset of them to see who is logged in. Most likely, we will be using a loop that iterates through a list of the device names and calls our api for each one. We can always create a list of our devices and manipulate it each time we use our utility in order to target the desired subset of devices, and that will work. Or… or… we can create a common function that each utility or report can call to get the correct list of devices on-the-fly!
Lo and behold, we have already created a place to put such non-api reusable functions: The “DP_Common” test suite.
- Right-click “DP_Common” and select “New TestCase”
- Enter “CommonFunc” for the new test case name
- Expand the new TestCase
- Right-click on “Test Steps” and select “Add Step –> Groovy Script”
- Let’s name our new common function “GetDataPowerDeviceList”
When you hit enter, a blank editor window will appear so you can begin coding your groovy script. The Test Suite structure should look similar to the screenshot to the left.
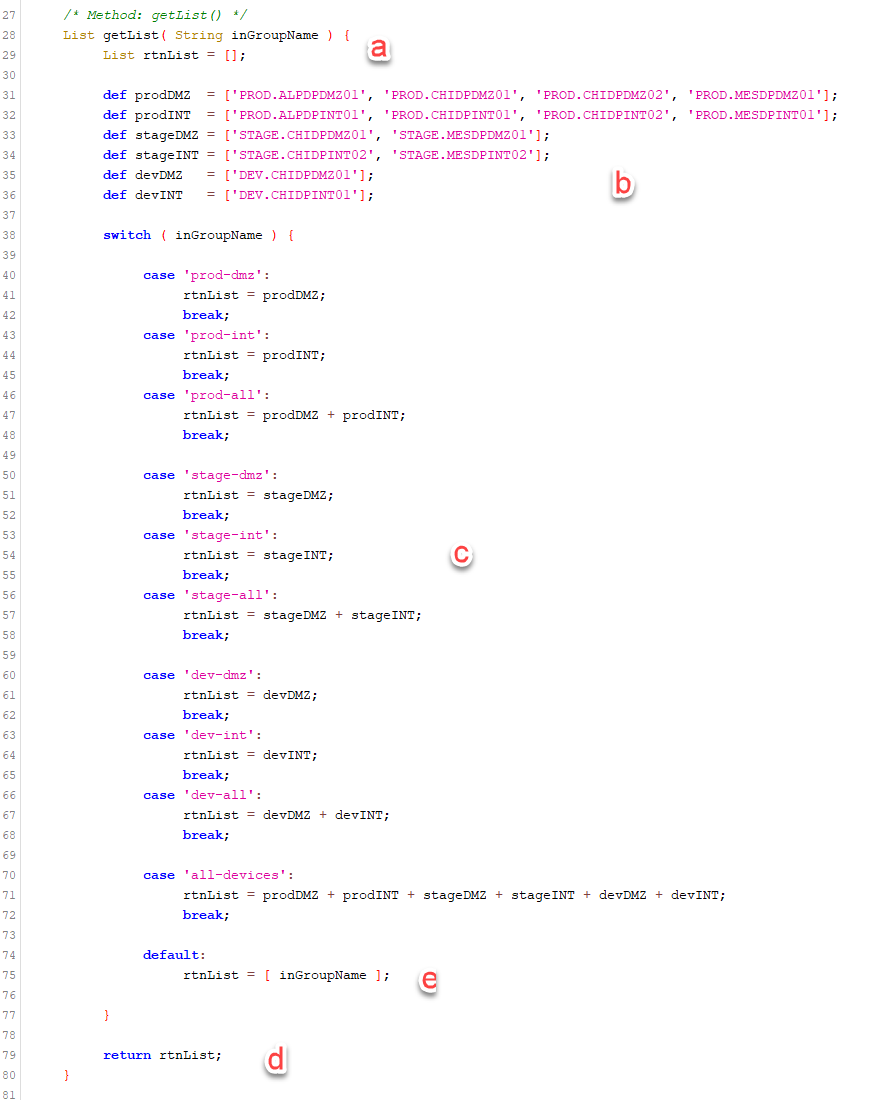
Let’s see what that the structure of our common functions will look like.
Right away we can see that the structure for common functions is going to be almost identical to that we used for our reusable api’s. We create a class definition with our three required properties (log, context, and testRunner) and we create a constructor method that sets those properties to the arguments passed. We also have the single line of code outside of and below the class definition that instantiates the class and assigns it to a context property so it can be used by the calling utility or report.
The difference here is that instead of a runAPI() method, we create a method that is our common function (a).
There is nothing that stops us from creating multiple methods in the class. If you wanted, you can create a single class containing multiple methods, one for each common function. But for our example, we will create one class with one common function, getList().
As you can see, the function will return a list[] holding the names of DataPower devices (a). We first create separate lists holding the names of the devices in our most oft used groupings (b). If those names confuse you, check out my other tutorial on setting up better soapUI endpoints. Or you can just put in the IP Addresses of your DataPower devices in similar groupings.
Next we use a switch statement to return the correct list or combine different lists together based on the desired group name as input argument (c). The default clause will just return the same string that was passed in as the group name. This allows the calling utility to pass in just the name of a single device if they wish and we will return it as a list so that the rest of the utility can function just on that one device. A good enhancement would be to validate the input argument string to make sure it is a valid device name or group name.
And then we just return the list object to the calling script (d).
Utility: ShowActiveUsers
So now that we have examples of a reusable api and a reusable common function, let’s create a utility that puts them to good use. We are going to create a utility named ShowActiveUsers. I named it ShowActiveUsers in order to distinguish the utility from the reusable api ListActiveUsers that it will be using. This utility will allow us to specify what group of DataPower devices to check (or all of them) and will write information about all the active (logged in) users to the soapUI log output.
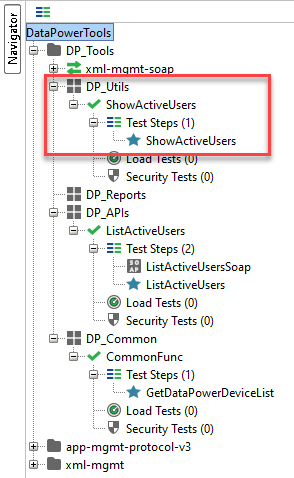
You should be familiar with this process by now, so go ahead and create the ShowActiveUsers test case and test step under “DP_Utils”.
- Right-click “DP_Utils” and select “New TestCase”.
- Name the TestCase “ShowActiveUsers”.
- Expand the TestCase and then Right-Click on “TestSteps” and select “Add Step –> Groovy Script”.
- Name the script “ShowActiveUsers”.
An empty editor will open so you can add your groovy code.
Your project navigator should now look similar to the screenshot here.
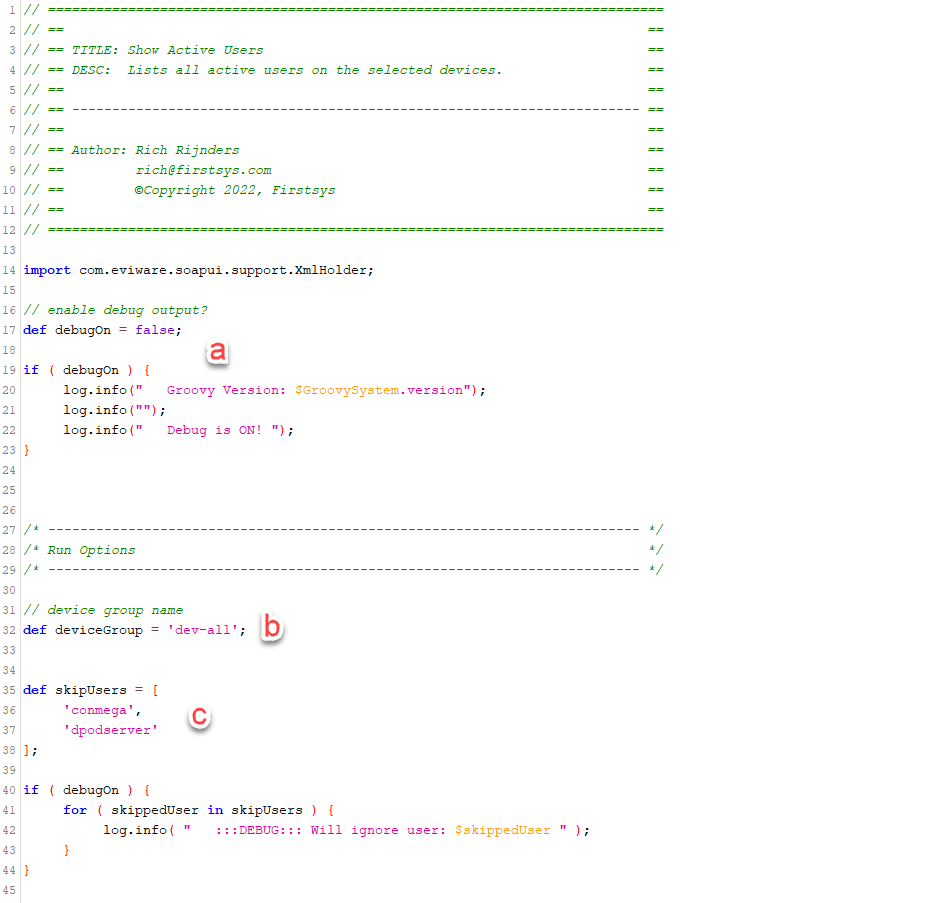
We will start our new utility with the standard header and import the XmlHolder object definition. Recall this is needed in order to get back the SOAP response as an XML object.
I always add a debugging flag that will trigger additional outputs that I add to my code (a).
We can set the name of the device group that we want to run the check against here (b).
Along with your own user ID, there are usually other user ID’s, created for logging and monitoring accessing the device. These will also be returned every time you run the API. we are not interested in those usually, so we add a list of user ID’s that will be ignored when generating the output (c).
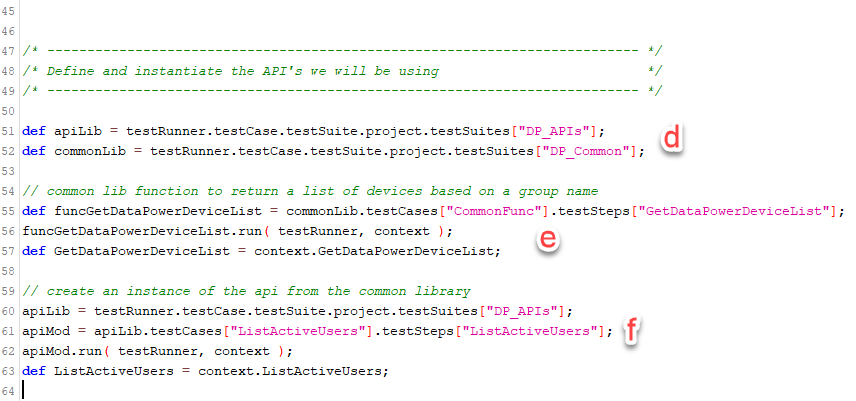
Next is where we define and instantiate our common API and function. First, we define variables that point to the common API and common function TestSuites, “DP_APIs” and “DP_Common” respectively (d).
Then (e) we set a variable to the common function TestStep GetDataPowerDeviceList and execute it using the run() method. This instantiates the object and sets a context variable pointing to it so that the following line can set a program variable to the same so we can access it directly.
The next block does the same things, but for the ListActiveUsers API (f). Now our common function and common API are fired up and ready to use.
Here we get to the where the action is. Most of your utilities and reports will be some variation of this basic construct.
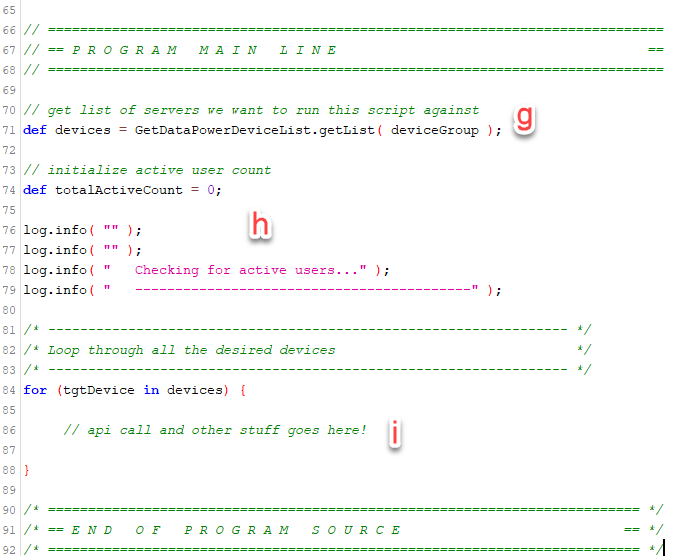
First (g) we execute the common function method to retrieve the list of DataPower devices we want to execute our utility against.
(h) We initalize a simple counter variable so that later we can output a total number of active users. We also write out a preamble to the log to remind us what this utility is for.
(i) This is where most of our work takes place. This loop iterates through the list of DataPower device names that we retrieved from our common function. This is where we will execute the common API to check for active users on all of desired devices. We will insert and discuss that code next.
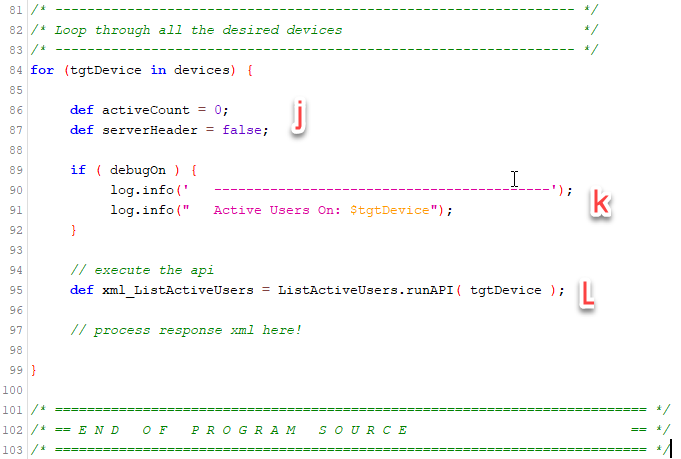
So let’s add some code inside this loop that will execute for each DataPower device. First we just initialize some working variables (j). The first one is just a counter to keep track of how many active users we found on this device. The second is just a flag to let my code know if I have output a header message for this device yet.
Next (k) we output a message (if the debugOn flag is true) so we know what iteration of the loop is executing.
(L) And here we go ahead and execute the common API, passing in the device name as an argument. The result XML is directly assigned to the “xml_ListActiveUsers” variable.
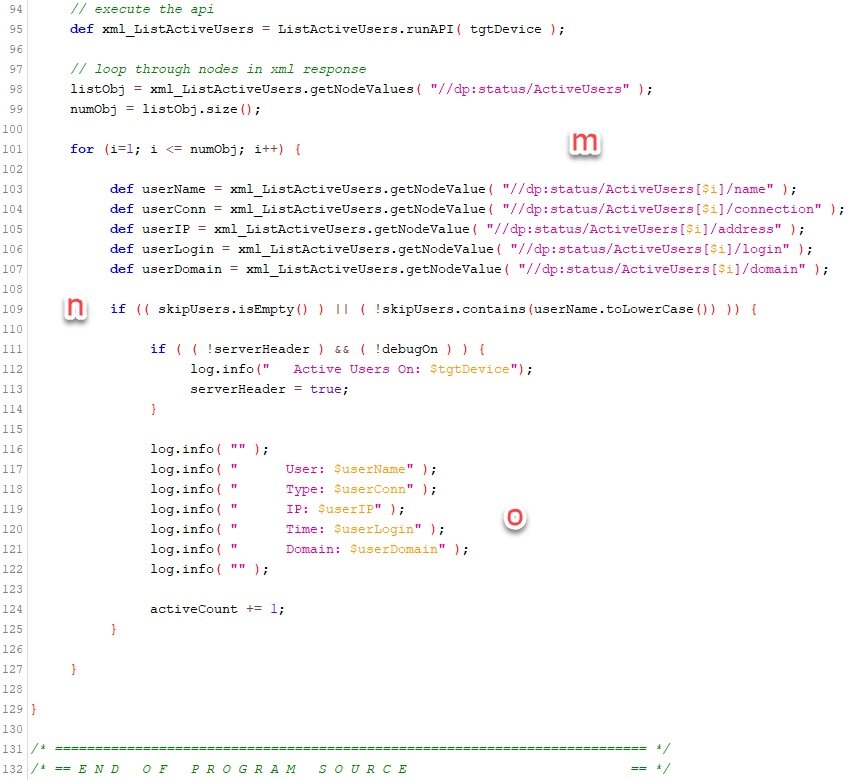
Having executed the API request and received the response, we now need to loop through the xml elements for each active user ID on the device (m). Read this for an in-depth explanation of how this works.
Note here (n) that we are skipping any user ID’s if they are found in our skipUsers[] list.
Finally, we output the user ID details to the log (o).
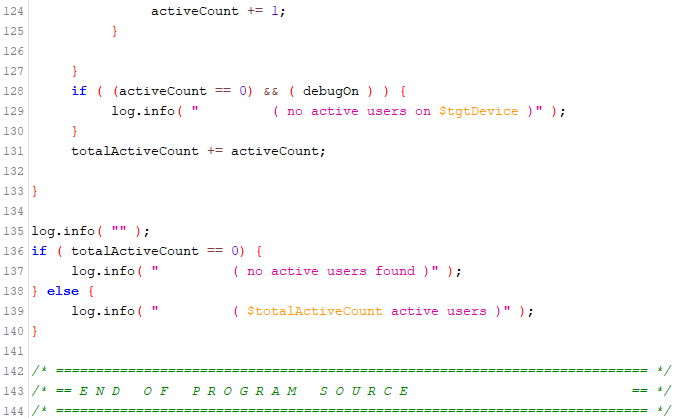
For completeness, we add some code to increment the counter for the number of active users and output that information to the log, as well.
And that completes the ShowActiveUsers utility! You can specify a group of DataPower devices and quickly run this utility to see who is currently logged in to those devices. When you run this, it will output information to the log similar to the output below. Play around with the run options and debugOn flag to see how it changes the expected output.
Summary
In this tutorail we outlined a how you can use soapUI and the IBM DataPower API’s to set up a framework for developing utilites and reports to help you manage your DataPower platform. We created a soapUI TestSuite structure for creating common library functions and reusable API’s to be used in those utilities and reports. We developed one common function that can be used in all of your Utilities and Reports to return a list of DataPower devices to run the API’s against. We developed one such reusable API to check a DataPower device to see what users are currently active on it. Finally, we created a sample utility, ShowActiveUsers that will quickly check a grouping of DataPower devices and display which users are active on those devices.
In future tutorials, we will develop more complex utilities to do things like upload files and security certificates, and reports that generate Excel spreadsheets with information retrieved from the DataPower devices. Be sure to check back for those and other tips and tutorials.

