
Introduction
In this tutorial we will endeavor to set up our Drobo 5N (or 5N2) as a Git server. That is, the Drobo will host Remote Git Repositories for our local Xcode projects that are under Git source control. With this setup, we can work on our Xcode projects on our desktop or laptop computers, make and commit changes to our Local Git Repository and then push those changes to the remote repository which resides on our Drobo. This will allow us to collaborate with other developers on our projects. They will be able to clone our projects from the Drobo to their own computers so that they can work on the code, check in their changes, and then push those changes back up to the Drobo. We can then branch and fork our projects for even more flexibility, safety, and control over our code base.
This setup will actually allow you to use the Drobo as a remote repository for any project you have under Git control (Xcode or otherwise) by using the Git command line interface (CLI) from a terminal window. But in current releases, Xcode for Mac OS X has included support for Git / GitHub built right in to the IDE. Our goal is to get our Drobo hosted Git server working seamlessly from within the Xcode IDE.
Why Not Just Use GitHub?
This question was asked of me more than once while I researched issues related to getting this setup working. It is true that Xcode has pretty good support for interfacing with the GitHub web service, however; there are several reasons why you might want to setup up your own Git server on your own Drobo, instead:
- GitHub is a product of Microsoft. Sure it has a free tier right now (with limitations) but that might not always be the case. You may not want to build your projects using a platform that could change its terms at any time, leaving you in a lurch.
- Maybe you have government or contractual obligations that prohibit you from hosting your source code on external servers.
- Perhapse you just don’t trust your super-secret killer app source code on a server you don’t own or control.
- Heaven forbid you just want to learn how to use Git and manage a remote Git repository to improve your skills and add them to your resume or CV!
There may be any number of reasons why you want to do this. Not the least of which is my own: Because some enterprising hacker created a Git port that runs on Drobo and, by golly, I should be able to get it working with Xcode! That is all the justification any hack worth his/her salt needs! So let us begin.
The Pieces
I will assume that we already have a running and configured Drobo 5N or 5N2. Likewise, I will assume that we have one or more desktop or laptop computers on the same network as our Drobo NAS with Xcode installed for development (otherwise this effort is for naught). Given these, here is what we are going to install and/or configure in order to reach our goal:
- We will install the Drobo App called Git SCM on the Drobo. This is our Git Server
- The client computers (the desktops or laptops) will connect to the Git Server using SSH – so we need an SSH server on our Drobo, as well. Luckily there is another Drobo App called Dropbear that fits the bill. We will install this on our Drobo, too.

- We will create a new Share called “GIT” on our Drobo as the root location where all of our Git Remote Repositories will reside.
- We will create a new user account on the Drobo named “git”. This account will own all of the Git Remote Repositories and perform all Git functions on behalf of our Git client users.
- To control who can use our Git Server, we will install the SSH Public Keys of each of our Git Clients into the authorized_keys file of the “git” user account on the Drobo.
- We will create symlinks to each of the Git executables inside the “/user/bin” directory on the Drobo.
- Logged in and running as the “git” user on our Drobo, we will create a new directory on the “//GIT/” share for each Git project and initialize it using the “git –bare init” command.
- We will configure the new Git repository on the Drobo as a Remote Git to each of our Xcode projects.
- Finally, we will use the Push option from within Xcode to push our project from the client computer to the Drobo Git Remote Repository!
And if you get all the way through with this setup, there is a bonus code snippet I created to make your Xcode + Drobo + Git administrative tasks a bit easier!
Installing the Drobo Apps
The first thing we need to do is to install the Git SCM and Dopbear apps on our Drobo. This is a pretty straight forward process. Just open the Drobo Dashboard on your computer and connect to the Drobo you want to use as your Git server (yes, people often have more than one Drobo). Click on the “Drobo Apps” item in the left-hand menu. Select the “Category” button to sort all the available apps, then scroll all the way down to the “System Utilities” section.
In the System Utilities section you will find the two apps we need: “Dropbear” and “Git SCM”. Installing the apps is straight forward. Just double click each app and then select “Install”. Do this for each of the two apps. Once they are installed, the little “LED” underneath the app icons will turn green and you are good-to-go.
Create a Drobo Share to House Your Git Repository
Now we are going to create a location on the Drobo to house all our Git repositories. In reality, you can just create a directory on any of your existing Drobo Shares, but I recommend creating a dedicated share just for your Git. This location or share never has to be mounted so there is no point in putting it on an existing share where all of the Git nuts and bolts can be viewed by users of the Drobo!
Again, connect to your Drobo with the Drobo Dashboard. In the left-side menu, click “Shares” and then click the “Share Settings” button.
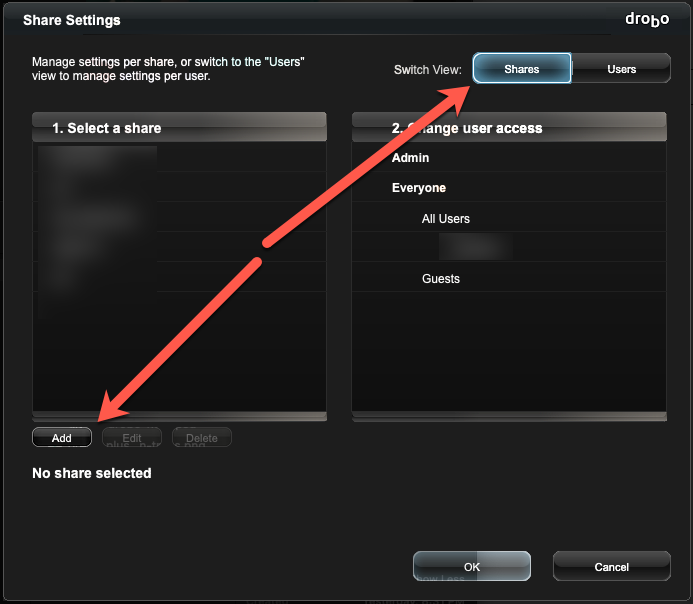
In the Settings panel, make sure you have the “Shares” view selected. In the left pane you should see a list of all of the existing Shares on the the Drobo. Below the left pane is an “Add” button to create a new Share. Click it.
In the “Add Share” popup window, specify a name for the new share. “GIT” seems sort of obvious, but you can name it as you like. For the purpose of the rest of this tutorial I will refer to the share as “GIT”. Don’t worry about the Time Machine options, just enter the name for the new share and press “OK”.
You should now see the new “GIT” share listed in the “Shares” panel with all the other Drobo Shares. There is no need to mount the share or authorize any Drobo Users to use it, just move on to the next section where we are going to do some command line work!
Create A “git” User On The Drobo
Now we will create a user named “git” on our Drobo. This user ID will own all of the Git Remote Repositories created on the Drobo. It will create all of the Git directories and artifacts, so it will own all of the objects and we can be sure that it always has the authority to manipulate the archives on behalf of the Git clients/users.
Note that you will NOT be creating “git” as a “Drobo User” through the Drobo Dashboard! This user will be created in the Drobo OS as a regular OS user. The reason for this is that Drobo Users – those created through the Drobo Dashboard – are not true “user” ID’s at the OS level. In fact, if you SSH over to your Drobo using your Drobo Admin ID and then check the contents of the /etc/passwd file, you will see that the only Drobo User ID in the file is the Admin.
So go ahead and open up the terminal app (command line) on your computer and SSH over to your Drobo using your Drobo Admin ID and the IP address of your Drobo. If you don’t know the IP address of your Drobo, you can find it in the Drobo Dashboard under “Drobo Settings” and selecting “Network”. Write it down or memorize it since you will be using it a lot.
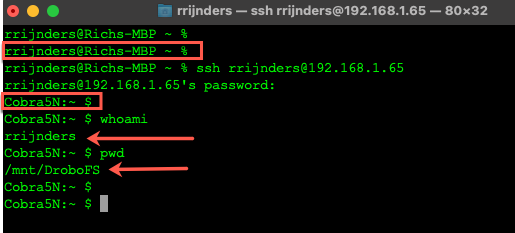
ssh yourdroboadmin@your.drobo.ip.addressAfter your terminal session connects with the Drobo, you will be prompted to enter the admin password for the Drobo. Note that this is the password for the Drobo admin, not for your computer, since you are logging into the Drobo OS. If you successfully log on to the Drobo, you will be presented with a command prompt. You will know that you are now on the Drobo because the command prompt will change from your computer name to the Drobo name, as shown here.
So now we are going to create our “git” user ID. At the Drobo command line enter:
sudo adduser -h /mnt/DroboFS/home/git git
You will be prompted to enter your Drobo admin password and then you will be prompted to enter a new password for the new “git” user id. Enter the desired password (twice). If successful, you will see a message telling you “passwd: password for git changed by root” or something to that effect. To confirm that your new “git” user was successfully created, type:
sudo su git
You may be prompted to enter your Drobo admin password again if it has been some time since the previous command. If successful, you will be returned to the command prompt. To confirm that you are now running as the new “git” user, enter:
whoami
If the output is “git” then you have successfully created the new “git” user ID. Type “exit” to revert to the Drobo admin user ID, then type “exit” again to log out of the Drobo and return to the command line on your own computer.
Add Your SSH Keys to Use the Git User Account
In this next step, we are going to take the public SSH key from our computer and add it to the “.authorized_keys” file of the “git” user on the Drobo. This will allow us to issue SSH commands from our computer to the Drobo without having to enter the “git” user’s password every time. This means that other users/computers will also be able to issue SSH/Git commands from their computers without you having to distribute the “git” password to everyone (so long as you have also added thier SSH public key to the “git” user’s .authorized_keys file, as well). Now you can control who can access and use the Git repository on the Drobo without having to create new Drobo users or distribute the git password. Only those computers for which you have added the public SSH key to the git user’s .authorized_keys file will be able to use the Git repository.
So you should now be back at the command prompt in terminal on your computer (after exiting the Drobo at the end of the previous section). First, let’s see if you already have an SSH keypair generated for your computer. From the command line, navigate to your user’s home directory and then check that you are indeed there:
  cd ~/
  pwd
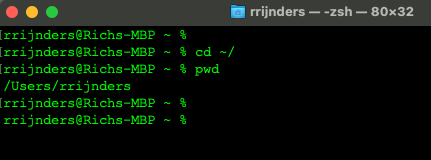
Your terminal screen should look something like this:
Do You Already Have An SSH KeyPair?
To check if you already have an SSH KeyPair created on your computer. Enter:
ls -al .ssh
If you already have a keypair created, the output will list three files:
  id_rsa
  id_rsa.pub
  known_hosts
If this is the case, you can skip the next part for creating the SSH KeyPair and move on to “Copying The Public Key”.
If, instead, the output of the “ls” command was
ls: .ssh: No such file or directory
then you do not yet have an SSH KeyPair. No worries, we will generate one below.
Create An SSH KeyPair
If you need to create an SSH KeyPair, first make sure you are in your user’s home directory:
  cd ~/
  pwd
You should see the home path for your user id like
/Users/yourname
If you are in the right place, then start the key generation process by typing
ssh-keygen -t rsa
You will be prompted to enter a file name to save the KeyPair. Just hit ENTER to accept the default.
  Generating public/private rsa key pair.
  Enter file in which to save the key (/Users/yourname/.ssh/id_rsa):
You will then be prompted to enter a passphrase for the new key. You can just hit enter for no password. If you do enter a password, keep in mind that you will occasionally have to re-enter that password when issuing Git commands or performing Git functions in your projects. You will be prompted again to confirm the passphrase (or ENTER again for no passphrase). The result should look something like this
  Created directory '/Users/yourname/.ssh'.
  Enter passphrase (empty for no passphrase):
  Enter same passphrase again:
  Your identification has been saved in /Users/yourname/.ssh/id_rsa.
  Your public key has been saved in /Users/yourname/.ssh/id_rsa.pub.
  The key fingerprint is:
  SHA256:kf7WoKd6ZUkzS7UDnrOEk3SdaHE/6IRHZsKWT5Zt25E yourname@YourComputer
  The key's randomart image is:
  +---[RSA 3072]----+
  |         .o==+  .|
  |        ..OBBooE |
  |       .oB.B+ooo.|
  |       .+.X++ ...|
  |        S=.B..   |
  |         o*o     |
  |        .o+ .    |
  |        .+       |
  |      .o.        |
  +----[SHA256]-----+
You have successfully generated your SSH KeyPair. So now we will copy the public key to our clipboard and paste it in to the “git” user’s “authorized_keys” file on the Drobo.
Copy Your SSH Public Key Into the Drobo “git” User Authorized Keys File
Again, start by opening the terminal app on your computer and making sure you are in your home directory by typing
  cd ~/
  pwd
Now we will output the contents of our public ssh key file to the screen. Type
cat .ssh/id_rsa.pub
The output will be a long string of gibberish that looks something like this:
youruser@yourcomputer ~ % cat .ssh/id_rsa.pub
ssh-rsa AAAAB3NzaC1yc2EAAAADAQABAAABgQDNgAcRKBp5ZJVpuvKWtG0Jgv59vwr0G5RSmhxU3VnIPrzf16b+JSyGSnap6ZDKiLTiok+t1v2f+mFzgeeqa9OrH3irhWKh+Vy+/Rl8Z3uJMxLSOTB0rxMYD0MNTKTo+m32a8ITAE8ES8DvcGmGp5uT5pNhtAriaMM4hZusR6lbrOZUT1ffRPG2MMQOhfqQ9ZvJaqgO/OpM20sNNJ++67vtDlIwW4I0sNynk743g1+KUQOzO3Bggr9x8Iq25fLU4cOg49kxhBeQGjP6ykA6sYYvpdXn50TcCt1b0PjkOtnM/DAJKClBzPfF1BhJVyWhuB6wGWTIrjgfgCGcvIXbVI6w9kAiTwZvqsh8H8WNtxCp74DYYY5ONWezaLjATTI0h5Y5SJS6RdRbNSByXhuJnbIJx/GfbrMLF2wlwFAUPl9c9IfhMUEvZY7uqm12Jvvj2oqltTL5q2g3+PJ5FOhMwXq4YDyUKIlzDMXubiBKxJD0vNEUWDpIAs/49PKBDw5NeqU= youruser@yourcomputer
Select the entire public key string and copy it to your clipboard (CMD+C). Now we want to SSH over to our Drobo and log in as our “git” user
ssh git@your.drobo.ip.address
You will be prompted to enter the password for the “git” user on the Drobo. After you enter the password you will be in a command line session on the Drobo. You will know this because the command line prompt will have changed to the name of your Drobo instead of the name of your computer.
First, let’s make sure that we are running as the “git” user and are in the “git” user’s home directory using the “whoami” and “pwd” commands:
  MyDrobo:~ $ whoami
  git
  MyDrobo:~ $ pwd
  /mnt/DroboFS/home/git
If your session looks like the above, we are doing something right. So now, let’s make sure that the proper directories and files exist for our “git” user’s SSH. Enter:
ls -al .ssh
Your output should say
ls: .ssh: No such file or directory
because we haven’t created one yet. To create the required directory and set its permissions enter:
mkdir .ssh && chmod 700 .ssh
To create the “authorized_keys” file and set its permissions enter
touch .ssh/authorized_keys && chmod 600 .ssh/authorized_keys
Now that we have the required file, open the .ssh/authorized_keys file in your favorite command line editor, paste in the public key you copied from your computer (CMD+V), and save the file. If you haven’t installed a command line text editor on your Drobo, it does come natively with vi installed. You can search the internet for a quick tutorial on using vi, but in general your steps will be something like this:
- Enter “vi .ssh/authorized_keys”
- Type “i” to switch to insert mode
- Type “CMD+V” to paste the SSH key from your clipboard into the file
- Hit <ESC> to exit insert mode
- type “wq” to save the file and quit the vi editor
You can enter “cat .ssh/authorized_keys” to verify that your public key is in the file. Now that we have done that, let’s test that it is working as expected. Type “exit” to sign out of the Drobo and get back to your computer’s command line.
Back at your computer’s terminal command line, you should just be able to hit the UP arrow key to bring back the last command you entered and it should be the command to SSH into the Drobo using the “git” user. If not, just re-enter the command:
ssh git@your.drobo.ip.address
This time, when you press enter you should be taken straight-away to the command prompt for your Drobo without having to enter the “git” user’s password. If that is what happened then congratulations, your SSH keys are working as expected! Type “exit” to log off the Drobo and get back to your computer’s command line again.
Now we are going to test that we can run a command from our computer that will execute as the “git” user on the Drobo. At your computer’s command line, enter:
ssh git@your.drobo.ip.address "whoami"
If the response you recieved was “git” then we have success! This means that you entered the “whoami” command from your computer, it was executed on the Drobo as the “git” user and it returned that fact to your computer’s command line all the way from the Drobo! And you doubted me…
Add Symbolic Links (SYMLINKs) for Git Executables on the Drobo
Now that we have a “git” user ID on the Drobo and a way to execute commands as “git” remotely via SSH, we obviously want “git” to execute Git commands, right? On the Drobo, the Git SCM app installs the Git Executable files in
/mnt/DroboFS/Shares/DroboApps/git/bin/
But by default, our “git” user ID does not have this location in its PATH environment variable and so it cannot execute any of the commands from there because it will not find them. While logged in via SSH as the “git” user ID we can see our current PATH variable and using the type commend we see that our shell has no idea where to find the Git executable files:
  Cobra5N:~ $ echo $PATH
  /bin:/sbin:/usr/local/bin
  Cobra5N:~ $
  Cobra5N:~ $ type -p git
  Cobra5N:~ $
As the section title says, we are going to add a symlink for each of the Git executables into the “/bin” directory because “/bin” is in the default PATH and that will enable the “git” user shell to locate them. But first, I think some additional explanation is required here because some “obvious” solutions will not work and some work-arounds offered on the Internet will only partially solve the problem.
Modifying PATH Does Not Work!
OK, so maybe that’s a bit hyperbolic. Of course you can modify the PATH environment variable and it will work. You can do this temporarily in your current shell with the export command or permanently by modifying the /etc/profile file with the additional path to the Git executables. What I should have said is that it is insufficient for our needs to modify the PATH variable. Allow me to illustrate.
Here I have already modified the PATH variable to include the path to the Git executables. If I now use the type command, I can see that the shell does in fact locate the desired command:
  Cobra5N:~ $ echo $PATH
  /bin:/sbin:/usr/local/bin:/mnt/DroboFS/Shares/DroboApps/git/bin
  Cobra5N:~ $
  Cobra5N:~ $ type -p git
  /mnt/DroboFS/Shares/DroboApps/bin/git
  Cobra5N:~ $
So now I can execute any of the desired Git commands from the command line while SSH’d into my Drobo as the “git” user. But there is still a problem. Look what happens if I try to execute the command from my computer’s command line:
  rrijnders@Richs-MBP ~ %
  rrijnders@Richs-MBP ~ % ssh git@192.168.1.65 "echo \$PATH"
  /usr/bin:/bin
  rrijnders@Richs-MBP ~ %
  rrijnders@Richs-MBP ~ % ssh git@192.168.1.65 "type -p git"
  rrijnders@Richs-MBP ~ %
What gives? I modified the PATH variable permanently for the “git” user. Each time I log in via SSH to a command line shell as “git” on my Drobo, I can see the correct path added to the PATH variable and I can execute Git commands willy-nilly. So why does this change not affect the SSH’d commands from my computer to the Drobo? As it turns out (and by that I mean I discovered after hours of researching on the Internet) that Dropbear (you remember, that Drobo App we use as an SSH server on the Drobo) does not allow modification of the PATH variable for non-interactive shells. That is why no matter what you do to the PATH variable of the “git” user’s shell, issuing “echo \$PATH” via SSH still shows only “/usr/bin:/bin”.
Modifying the PATH environment variable is insufficient because Git commands issued remotely via SSH will still fail!
Adding “uploadpack” and “receivepack” to the Local Git Repository Config Does Not Work!
Yeah, yeah – “Is insufficient for our purposes”.
You might have seen some suggestions on the Internet directing you navigate to the project root directory on your computer and issue the commands
git config remote.origin.uploadpack /mnt/DroboFS/Shares/DroboApps/git/bin/git-upload-pack
git config remote.origin.receivepack /mnt/DroboFS/Shares/DroboApps/git/bin/git-receive-pack
What this essentially does is create a section in the local .git/config file that looks something like this:
  [remote "origin"]
    uploadpack = /mnt/DroboFS/Shares/DroboApps/git/bin/git-upload-pack
    receivepack = /mnt/DroboFS/Shares/DroboApps/git/bin/git-receive-pack
This tells the local Git configuration (the one for the project on your local computer) where to find those Git commands on the Remote Git server system. Beside the inconvenience of having to enter these for every local project, there are still a few other problems with this solution:
It does not work for all Git commands. It may work for the git push but not other operations. You would still have to run git clone with a bunch of “–” switches and pass the path strings directly in the command each time.
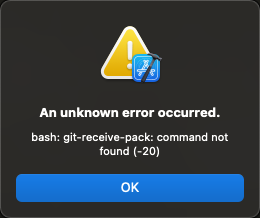
Worst of all, it does not work within the Xcode IDE! That is our goal, is it not? This solution may partially work if you want to issue all your Git commands from the command line in terminal, but if you try to push your project from the Xcode IDE menu (Source Control –> Push…) then you will immediately get this error:
The reason for this is because Xcode does not recognize the settings for the remote path in the .git/config file and so does not send them with the appropriate switches when issuing the remote commands via SSH.
Create the SYMLINKS!
So the solution I have found that actually works (for our purposes) is to create symbolic links or “SYMLINKS” for each of the Git executables in one of the directories that is in the default PATH of the “git” user when executing a non-interactive shell. So from your terminal app on your computer, SSH back to the Drobo using the Drobo Admin user account:
ssh droboadmin@your.drobo.ip.address
Enter the admin password and you should be in the command line shell of the Drobo. Now navigate to the /bin directory:
cd /bin
Now, just enter each of the following commands one at a time:
  sudo ln -s /mnt/DroboFS/Shares/DroboApps/git/bin/git git
  sudo ln -s /mnt/DroboFS/Shares/DroboApps/git/bin/git-cvsserver git-cvsserver
  sudo ln -s /mnt/DroboFS/Shares/DroboApps/git/bin/gitk gitk
  sudo ln -s /mnt/DroboFS/Shares/DroboApps/git/bin/git-receive-pack git-receive-pack
  sudo ln -s /mnt/DroboFS/Shares/DroboApps/git/bin/git-shell git-shell
  sudo ln -s /mnt/DroboFS/Shares/DroboApps/git/bin/git-upload-archive git-upload-archive
  sudo ln -s /mnt/DroboFS/Shares/DroboApps/git/bin/git-upload-pack git-upload-pack
You can check that all of the symlinks have been created by typing
ls -al git*
You should see a list of all the symbolic links you just create, like so:
  git -> /mnt/DroboFS/Shares/DroboApps/git/bin/git*
  git-cvsserver -> /mnt/DroboFS/Shares/DroboApps/git/bin/git-cvsserver*
  gitk -> /mnt/DroboFS/Shares/DroboApps/git/bin/gitk*
  git-receive-pack -> /mnt/DroboFS/Shares/DroboApps/git/bin/git-receive-pack*
  git-shell -> /mnt/DroboFS/Shares/DroboApps/git/bin/git-shell*
  git-upload-archive -> /mnt/DroboFS/Shares/DroboApps/git/bin/git-upload-archive*
  git-upload-pack -> /mnt/DroboFS/Shares/DroboApps/git/bin/git-upload-pack*
Type “exit” to get back to your computer’s command line. Now if we use the type command through SSH again, we see that our Git executable files are properly located:
  % ssh git@your.drobo.ip.address "type -p git-receive-pack"
  /usr/bin/git-receive-pack
  %
Creating and Initializing a New Git Remote Repository
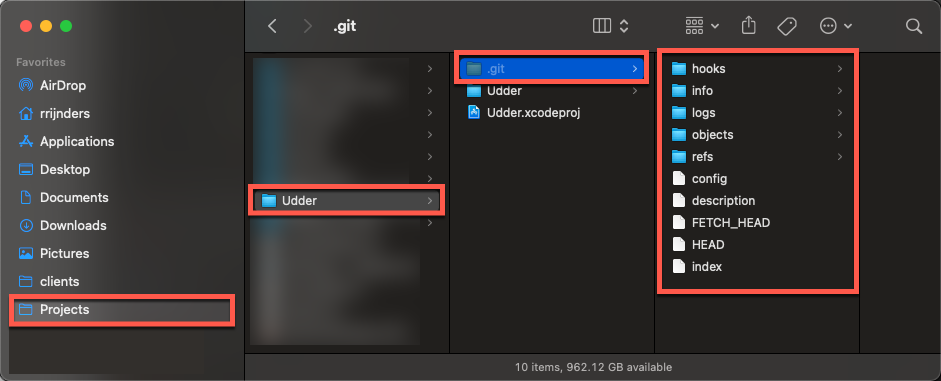
Now that we have all of our infrastructure in place, let’s create and initialize the remote repository for a given project. As an example, let’s say we have an Xcode project on our local computer called “Udder” and it is created in a directory called ~/Projects/Udder and it is already under local Git control. We want to push this project and all the existing commits to our Drobo hosted Git server. The steps in this (and the next) section must be done for each new project that you wish to be hosted on the Drobo Git server.
The first thing we need to do is to create a location for the project on the Drobo Git Server. This is simply a matter of creating a directory on the Drobo under the “GIT” share that we created earlier, and then initializing that directory using the git init command. So, once again, open your terminal app and SSH on over to the Drobo using the “git” user ID.
ssh git@your.drobo.ip.address
Once you have a Drobo command line, navigate to the “GIT” share we created earlier.
cd /mnt/DroboFS/Shares/GIT
Now create a directory for our project. You could actually name it whatever you want, but common convention is to give it the same name as the project folder on your own computer and add the “.git” extension to it. (Caution! If the original project directory name has spaces or special characters, it’s better to create the remote repository name replacing the spaces or special characters with a hyphen – or underscore _ otherwise you will encounter problems adding the remote location to the Xcode project in the next section).
Our project folder was named “Udder” so we will create a directory named “Udder.git”.
mkdir Udder.git
Now we will navigate into the new directory.
cd Udder.git
Once inside the directory, we want to initialize it for Git use. To do this, we will use the “git init” command with the “–bare” option. This option creates all the necessary Git artifacts, but does not create a working copy of the project as nobody will be editing code here directly.
git --bare init
Once you see the response:
Initialized empty Git repository in /mnt/DroboFS/Shares/GIT/Udder/
Then you know you have successfully created and initialized a Git Remote Repository! This location will now be the “url” of the Git Remote and referenced like in the following:
git@your.drobo.ip.address:/mnt/DroboFS/Shares/GIT/yourProject.git
Type “exit” to log off of the Drobo and return to your computer’s command line.
Adding the Remote Git Repository to Xcode
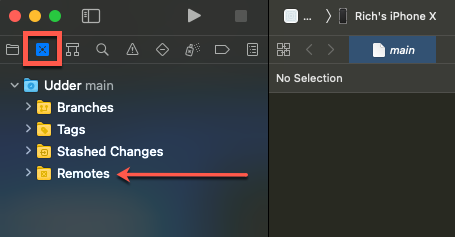
If you open an Xcode project, at the top of the left-side navigator pane is a square icon with an “X” inside of it. This is the “Source Control Navigator”. Click it and you will see the Git artifacts for your project. The last folder in the list contains all of the defined remotes for the project. If you expand that folder it will show any currently defined remotes. In the screen capture below for our “Udder” application I have highlighted the Source Control Navigator icon and the Remotes folder.
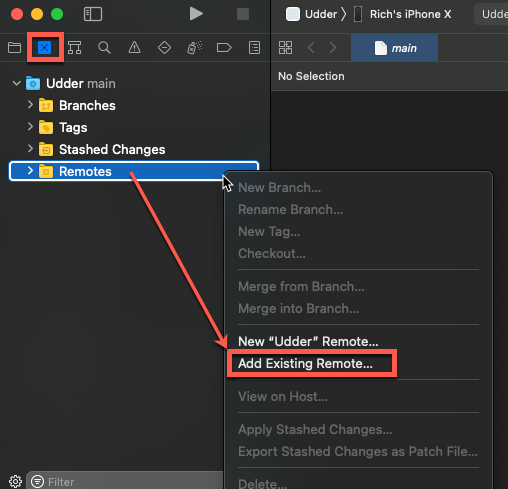
Adding the new Git Remote Repository as a remote location for this project is pretty straight-forward. The only thing to note here is that you will be using the option to add an existing remote and NOT the option to add a “new” remote.
So right-click or CMD+Click on the “Remotes” folder. In the pop-up menu about half-way down is the option to “Add Existing Remote…” Go ahead and click on that option.
The “Add an existing remote” dialog box is displayed. In the first field you will give the remote repository a name. Keep in mind that this name is only a reference for this project instance on this computer. Each Xcode instance and users on other computers that clone this project from the remote might give their remote reference a different name. The default name in Xcode is “origin” so we will use that name and type the word “origin” in the first input field.
The second input field is labeled “Location” and here is where we will enter the “url” for the Git Remote Repository that we created and initialized in the previous section. Enter:
git@your.drobo.ip.address:/mnt/DroboFS/Shares/GIT/yourproject.git
In the screenshot below you can see how I entered the url for the “Udder” project on my Drobo.
After adding the remote Git location to your local Xcode project, your Source Code Control Navigator will show the new location under the “Remotes” folder (you may need to expand that folder to see it). In the screen shot below you can see that the “origin” location has been added my “Udder” project. In the right-side panel is the Source Control Inspector. If you select the “origin” remote, this panel will show you the details (url) of that remote repository. You will also note that the remote is still empty – the center pane of the IDE is still blank. This is because we have not yet pushed our project up to the remote repository.
Push the Project to the Git Remote Repository
Make sure that all of your current changes have been committed to your local Git repository (Source Control –> Commit…). Now you are ready to push your local Git to the new remote Git. Click the “Source Control” menu and then select “Push…”. You should see a pop-up like the following.
The drop-down lets you select which remote you want to push the project to, and also which branch to push. We only have the single remote location configured (“origin”) and we also have only a single branch (“main”) so these are the only options in the drop-down. When you press the “Push” button, all of the Git artifacts will be pushed from your local Git repository to the new Git Remote on the Drobo. Once the push completes, you will see the updated information in your Xcode Source Control Navigator.
You can see that now under the “origin” remote we now can see the “main” branch. If we select that branch, then our center pane shows all of the commits we had previously performed on our local Git are now also on our Remote Git. Our project is now successfully uploaded to our new Git server! Congratulations!
Now that the project is available on our Drobo Git Repository, it is available for any of our colleagues to clone into their own Xcode. After you have added their SSH Public Key to the Drobo “git” user’s authorized_keys file, all they need to do is open Xcode and select “Source Control –> Clone…” and enter the url to the Drobo Git Remote.
git@your.drobo.ip.address:/mnt/DroboFS/Shares/GIT/yourProject.gitMission Accomplished!
Woot! We now have a working Git Remote Repository running on our Drobo working with Xcode on our computers. The only ongoing administration functions we will need to perform are
- Add new user’s SSH Public Keys to the “git” user account’s “authorized_keys” file
- Create and initialize a directory under /mnt/DroboFS/Shares/GIT/ for each new project
The first one is a security function so you will always have to do that as you are the administrator of your Drobo. But I think I can help you automate the steps of the second one…
Bonus Code!
Each new remote repository you want to create on your Drobo will require you to:
- SSH as “git” over to your Drobo
- Navigate to the GIT share
- Create a new directory for the project
- Navigate into the new directory
- Issue the “git init” command to initialize the directory for Git
- Log out of the Drobo
Six steps just sounds like such a pain! OK, stop rolling your eyes. I know it’s not really all that hard and I know that I wouldn’t be creating new repositories every day.
Still, I am a lazy hacker. I would rather write a tool to do those six steps than have to remember them and do them myself. Even better, a tool that other people can use to do the task for themselves…
The Create Git Repository Script
So from the laziness of my La-Z-Boy desk chair, I present to you this bit of shell scripting:
Just download the zip to your computer, unzip the “createGitRepo.sh” file, copy it to your Drobo’s “/bin” directory and make it executable.
Then, from the comfort of the terminal on your own computer you can simply type in
ssh git@your.drobo.ip.address "createGitRepo.sh 'killerApp'"
When executed, the script will produce output similar to the following:
  me@MyMBP ~ % ssh git@192.168.1.65 "createGitRepo.sh 'killerApp'"
  Initialized empty Git repository in /mnt/DroboFS/Shares/GIT/killerApp.git/
  SUCCESS! /mnt/DroboFS/Shares/GIT/killerApp.git repository has been initialized!
  Remote Repository URL is: git@192.168.1.65:/mnt/DroboFS/Shares/GIT/killerApp.git
  me@MyMBP ~ %
If you created a Drobo share named “GIT” as in our instructions then you don’t have to change a thing in the script. If you put your Git base directory somewhere else, then just edit line 47 with the correct location. Also, if you don’t know how to copy the script to your Drobo and make it executable, there are some instructions below.
Copying and Installing the Script
Once you download the zip, you can double-click on it to unzip the file inside. On a Mac, this would normally mean the file is in your “Downloads” directory. Wherever yours ends up, open the terminal app and navigate to that directory. Once there, you will enter the following sequence of commands:
  scp createGitRepo.sh git@your.drobo.ip.address:~/
  ssh yourDroboAdminID@your.drobo.ip.address
  sudo chmod 700 /mnt/DroboFS/home/git/createGitRepo.sh
  sudo mv /mnt/DroboFS/home/git/createGitRepo.sh /bin/createGitRepo.sh
  exit
That’s it! Your script is ready to create new Git Remote Repositories on your Drobo





Thank you for taking the time to put together this comprehensive and very helpful post. With your help, I was able to set up my git server on my Drobo5N.